Decreasing Angular build sizes

Within the web-app development landscape, there is always a need for faster applications. One of the many ways to accomplish this goal is by ensuring the apps we release are as small as possible. Smaller app bundles provide:
- Reduced loading times
- Faster deployments
- Lower bandwidth usage
Within this blog post, I will zoom in on the topics that had the biggest impact on the projects within Geckotech.
To follow along with some of the improvements we are going to cover you will need the following prerequisites;
- Angular CLI 16
- Node.js version v14.20, v16.14 or v18.10
- NPM
- Prior knowledge of Angular
- Prior knowledge of Typescript
Analyzing Angular build sizes
Before we can improve the build size of our application, it's a good idea to get a grasp of the structure of our app. In order to do this, let us first generate a new Angular application:
ng new gecko-blog
Now that we have an empty project, we can check our initial build size by running the following command and looking at the output inside our terminal;
ng build
The initial output of our application now make looks something like this;
Initial Chunk Files           | Names         |  Raw Size | Estimated Transfer Size

main.b0a53a22139700d3.js      | main          | 207.03 kB |                54.94 kB

polyfills.2362e3939a8ff60a.js | polyfills     |  33.06 kB |                10.69 kB

runtime.ee3a20f0cb08bb0f.js   | runtime       | 898 bytes |               518 bytes

styles.ef46db3751d8e999.css   | styles        |   0 bytes |                       -


                              | Initial Total | 240.97 kB |                66.13 kB
In order to visualize the benefits of analyzing the build we are going to rely on 2 plugins; https://www.npmjs.com/package/webpack-bundle-analyzer and https://www.npmjs.com/package/moment.
lets install both npm packages
npm i moment webpack-bundle-analyzer
Next, let's import the moment library in our app.component.ts and use it;
import {Component, OnInit} from '@angular/core';

import * as moment from "moment";


@Component({

 selector: 'app-root',

 templateUrl: './app.component.html',

 styleUrls: ['./app.component.scss']

})

export class AppComponent implements OnInit {


 ngOnInit() {

  const today = moment();

  console.log('today: ', today);

 }

}
In order to see what impact this change has on our bundle size, lets run ng build again;
Initial Chunk Files           | Names         |  Raw Size | Estimated Transfer Size

main.7a9b74e04dcb5090.js      | main          | 580.33 kB |               114.93 kB

polyfills.61bbb82e5037ee39.js | polyfills     |  33.06 kB |                10.65 kB

runtime.f61f9f9a6f538ce3.js   | runtime       | 992 bytes |               558 bytes

styles.ef46db3751d8e999.css   | styles        |   0 bytes |                       -


                              | Initial Total | 614.36 kB |               126.12 kB
The initial bundle size increased by more than 150% due to the addition of the moment library!
In the output above, it is not easy to see why. In order to get a better visualization, we can use the webpack-bundle-analyzer. The Angular CLI already provides the functionality to build with a stats.json out of the box. We can then pass these results to webpack-bundle-analyzer.
First we run:
ng build --stats-json
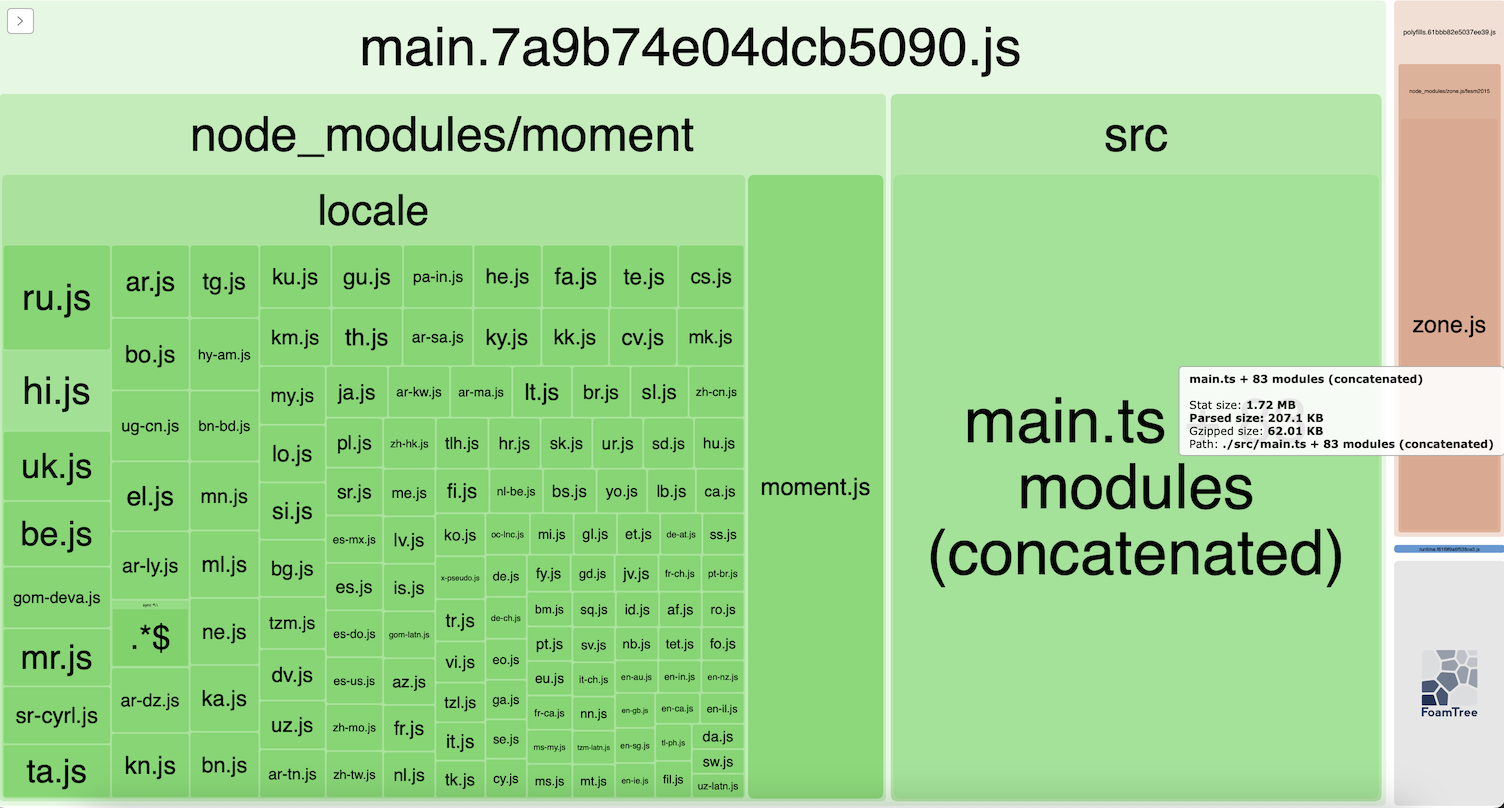
This generates a stats.json file in the /dist directory of our project. Then we run the webkit-bundle-analyzer for displaying a treemap diagram of the results:
webpack-bundle-analyzer dist/gecko-blog/stats.json
The diagram clearly shows the moment library takes up a huge chunk of space compared to the rest of the application. Using this visualization, we can get a good grasp on where all the bytes are going. It helps to decide which libraries/components/modules that are unused could be dropped. Or which libraries should be replaced by more light-weight alternatives.

Other than the webpack-bundle-analyzer, without the use of any extra libraries, Angular will help us manage our bundle sizes. In our angular.json file we can see configuration limiting the size of our builds:
"configurations": {

 "production": {

  "budgets": [

   {

    "type": "initial",

    "maximumWarning": "500kb",

    "maximumError": "1mb"

   },

   {

    "type": "anyComponentStyle",

    "maximumWarning": "2kb",

    "maximumError": "4kb"

   }

  ],

 "outputHashing": "all"

},

...
As you've probably noticed, after we added the moment library and build the project, the CLI outputted the following warning;
Warning: bundle initial exceeded maximum budget. Budget 500.00 kB was not met by 114.36 kB with a total of 614.36 kB.
Tree Shaking and Dead Code Elimination
As there are already many great explanations on the internet of what Tree Shaking and Dead Code Elimination (within the context of Angular) are, I'd like to grab a snippet from EJ2:
"Tree shaking is a way to eliminate unused modules from the final bundle file of the application. The Angular CLI, by default, uses the Webpack bundler for bundling script files, which supports Tree Shaking from version 2. It allows for only including the parts of the code that are actually used by the application, thus reducing the final bundle size, which leads to improved performance, faster load times and better user experience."
In the projects angular.json configuration file, we can configure which files should be excluded during the shaking process of dead code.
...

"development": {

 "buildOptimizer": false,

 "optimization": false,

 "vendorChunk": true,

 "extractLicenses": false,

 "sourceMap": true,

 "namedChunks": true,

 "styles": [],

 "fonts": [],

 "scripts": []

}

...
Code and Asset Optimization
By far the main culprit of bloating Angular build sizes are the assets we use within our project. Let's go over a real example to illustrate what we can do right now to decrease the bundle sizes of the apps that we already build and use today. First, let's look at some of the processes that Angular already takes care of. Out of the box, Angular already applies some code and asset optimization techniques for us. For example:
- Code minification, making the JavaScript output smaller by removing whitespace and comments
- Uglification, which is renaming functions and variable names to make them shorter and reduce the size of output even further
- AOT compilation, which removes the need for shipping the Angular compiler the the client's browser.
Fonts
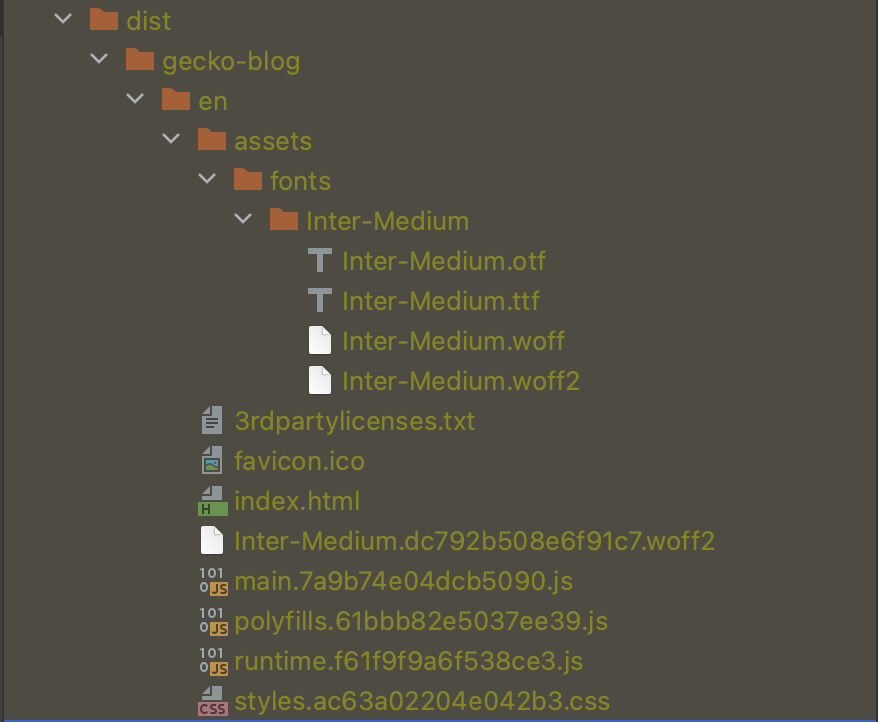
One of the important issues that I ran into recently, was that within our applications we include a lot of different filetypes for fonts. Some of font files that we include in our bundle are quite large, and thus increase bundle size significantly. Take a look at the image below, where the TrueTyped Inter-SemiBold font file is nearing 1MB, compared to the .woff2 files which are always the smallest. Note that all fonts located in the assets directory of your project are outputted to the /dist/assets directory after building.

Since these files are as big, I wanted to know wether we could exclude some of them. As it turns out, looking at https://caniuse.com/woff2 shows almost all browsers other than IE and Opera Mini support this font type. Since including all font types is only used as a fallback in case the browser does not support woff2, we decided to only include woff2 font types in our production builds.
While including a font from your project assets usually looks like this in .scss;
@font-face {

 font-family: 'Inter-Medium';

 src: local('Inter-Medium');

 src: local('Inter Medium');

 src: url('../../assets/fonts/Inter-Medium/Inter-Medium.eot') format('embedded-opentype'),

 url('../../assets/fonts/Inter-Medium/Inter-Medium.woff2') format('woff2'),

 url('../../assets/fonts/Inter-Medium/Inter-Medium.woff') format('woff'),

 url('../../assets/fonts/Inter-Medium/Inter-Medium.ttf') format('truetype'),

 font-weight: normal;

 font-style: normal;

}
Getting rid of the imports we don't need, we are left with;
@font-face {

 font-family: 'Inter-Medium';

 src: local('Inter-Medium');

 src: local('Inter Medium');

 url('../../assets/fonts/Inter-Medium/Inter-Medium.woff2') format('woff2'),

 font-weight: normal;

 font-style: normal;

}
As you may have noticed, the paths to these fonts are relative. This is only necessary if you build your app for multiple languages, since your /dist directory will get an extra layer of depth by outputting the compiled web-app in each of your projects' determined languages. See the illustration in the image below. If we don't use relative paths for our assets when building localized applications, the asset links are broken when we try and serve our app in our browser in a different language.
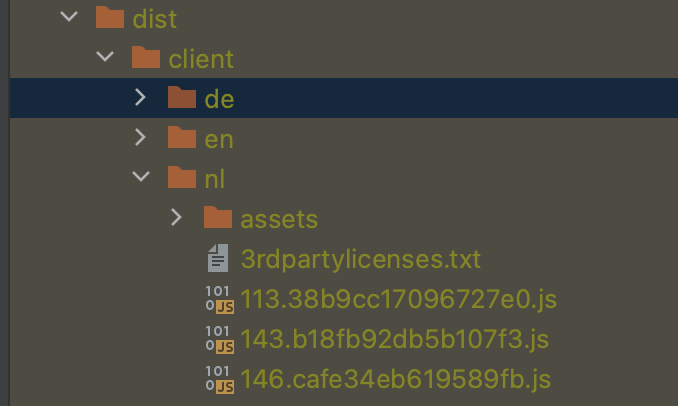
A very important quirk of webpack is that all assets with a relative path are also copied to the root of the localized project within our projects' /dist directory when we build. This means that we'll have duplicate assets in each of our localized directories.
Since we need these relative paths, and we know that webpack always copies these assets to the root of the localized directory, we can always exclude the fonts directory for our production build process. Inside our angular.json file we update the 'assets' configuration within the 'build' section:
"build: {

 ...

 "assets": [

  {

   "glob": "**/*",

   "output": "/assets",

   "input": "src/assets",

   "ignore": [

    "**/fonts/**/*"

   ]

  }

 ],

 ...

}
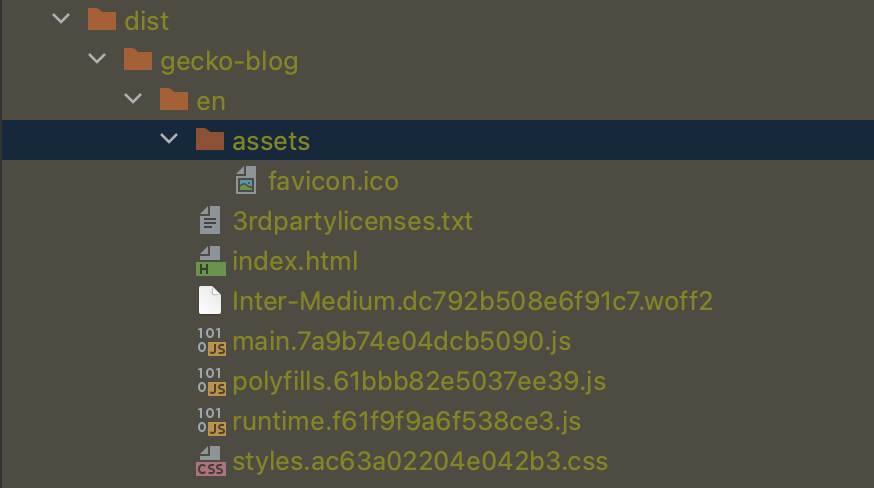
Now, if we build a new bundle, only the font that we are using will be outputted and no duplicate or unused font files are present in the assets directory as shown in the image below:
It's good to keep in mind that all asset replacements with 'url(...)' in .scss files are handled by webpack, resulting in copies of assets in the root of your project build output. Any assets, either via a relative or absolute path, included in your projects' template files (.html) are parsed by the Angular compiler, and are not copied. Ideally, for optimization, you want to exclude the assets you use in your stylesheets for your build process, and only include the assets you use in your template files.
Conclusion
In this blogpost we touched on some build optimization related features of Angular and what tools or configurations we can use to monitor and improve our web application bundle sizes. We also went through a couple of important techniques for reducing bundle sizes.
I hope this blogpost helped you with improving your Angular applications and gave you a better understanding on what tools you can use to reach these goals.