GUI Driven by Control Flow
Over the past few months, I've been working on a data analytics dashboard written in Rust as an intern at Geckotech.
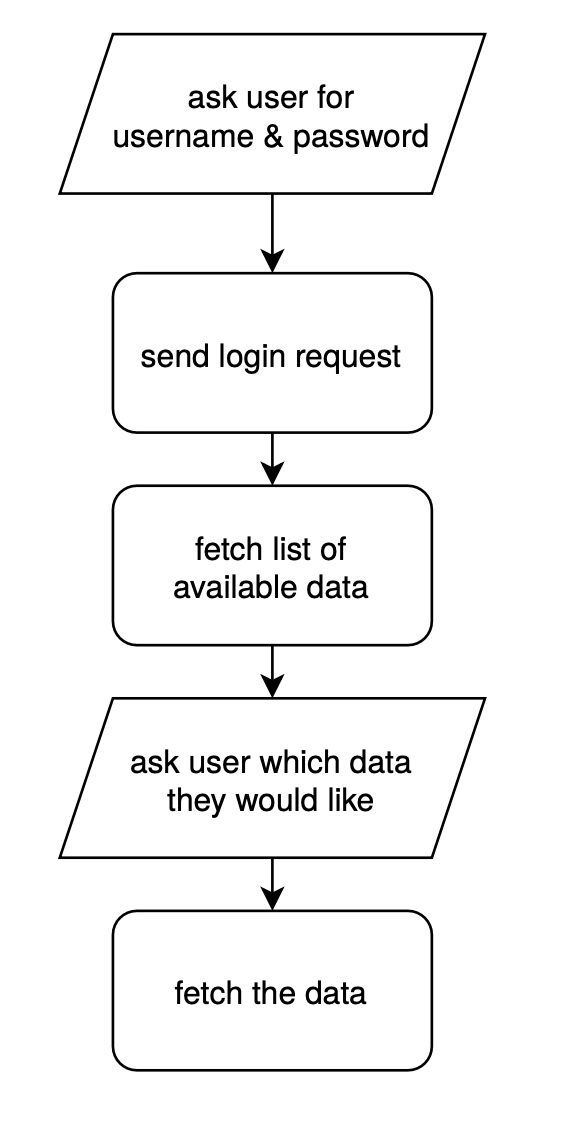
One functionality we implemented was the ability to have connectors that fetch data from different internet sources and convert them into tabular format to feed into the dashboard.
These connectors tend to have very simple and linear workflow:
Manual Approach
The contemporary approach to implementing a GUI for this workflow would be to write a state machine.
First, there would need to be a state type that can represent each step in the process
enum State {

  BeforeLogin { },

  LoggingIn { login_req: AsyncTask },

  FetchingList { token: String, list_req: AsyncTask },

  ChoosingData { token: String, list: Vec<DataId> },

  FetchingData { token: String, chosen: DataId, data_req: AsyncTask }

}
and then functions to transition between different states
/// transition from the 2nd state to the 3rd

fn when_logged_in(&mut self, token: String) {

  match self {

    Self::LogginIn { .. } => {

      *self = Self::FetchingList {

        token,

        list_req: spawn(/*...*/),

      };

    }

    _ => panic!("not in the right state")

  }

}

// ..........................................

// other transition functions omitted.

// .........................................
and finally, code to render the UI every time the state is updated
fn display(state: &State) -> Ui {

  match state {

    Self::BeforeLogin => /* login form */,

    Self::ChoosingData => /* options list */,

    _ => /* maybe a loading spinner */

  }

}
The Problem
State machines like the one above are extremely common. But hand implementing all of them might not be the best idea. The transition functions are boilerplaty and quite difficult to read.
Is there a more concise way to make state machines?
Control-Flow Approach
In Rust, async code makes state machines. There's a detailed explainer here. In short, the Future generated from an async block is a state machine in which each state corresponds to an await point, storing the local variables at that point.
Written as async code, the connector state machine is roughly
async fn connector() -> Data {

  // state 1

  let (username, password) = show_login_form().await;


  // state 2

  let token = login(&username, &password).await;


  // state 3

  let list = fetch_list(&token).await;


  // state 4

  let chosen_data_id = show_list(&list).await;


  // state 5

  get_data(&token, chosen_data_id).await

}
No more transition functions! Here, the control flow - the simple advancing of execution from one line to the next - is what transitions the state machine.
Presenting the UI
Back in the manual approach, there was a `display` function that takes in the state machine and presents the appropriate UI. That won't work here. Futures generated from async code are opaque; they can't be displayed; they need to present their UI themselves.
With Async UI (which I made and am using), presenting UI from async code is trivial. Just add rendering code to `show_login_form` and `show_list`. The `connector` code from above remains the same.
async fn show_login_form() -> (String, String) {

  let (username, password) = (Input::new(), Input::new());

  let button = Button::new();

  button.until_click().meanwhile(

    join((

      username.render(),

      password.render(),

      button.render("Login".render())

    ))

  ).await;

  (username.value(), password.value())

}
In other frameworks, the UI might need to be manually "sent out" of the async `connector` function.
For example, if you're using Dominator, the `show_*` functions can build Doms and send them through a channel to be displayed.
// `channel` is for sending out UI to be displayed

async fn connector(channel: Sender<Option<Dom>>) {

  // `show_login_form` can show its UI by

  // sending a `Dom` into the channel

  // `channel.send(Some(html!(...)))`


  let (username, password) = show_login_form(&channel).await;

  // ...


  let chosen_data_id = show_list(&list, &channel).await;

  // ...

}


let (tx, rx) = futures_signals::signal::channel(None);

html!("div", {

  .child_signal(rx) // render what is sent through the channel

  .future(connector(tx)) // launch the state machine

})
If you're using a React-like framework, you might do something along the line of
const [ui, setUi] = useState<ReactNode>(null);

useEffect(() => {

  // launch the connector

  // pass in setUi so it can put in its UI to be rendered

  connector(setUi);

}, []);

return ui;
Advantages
Let's examine the advantages the control-flow approach brings over the manual approach.
Concise & Readable Code
Not much to say here. The code examples above speak for themselves.
Language Features
Rust comes with cool control-flow operators such as `match`, labeled `break`s, and `?` (try operator). We can take full advantage of these in the control-flow approach.
For example, I added error handling to the connector
.png)
async fn connector() -> Result<Data, Box<dyn Error>> {

  // loop until successful login

  let token = loop {

  let (username, password) = show_login_form().await;

    if let Ok(token) = login(&username, &password).await {

      break token;

    }

  };

  let list = fetch_list(&token).await?; // try operator

  let chosen_data_id = show_list(&list).await;

  get_data(&token, chosen_data_id).await? // try operator

}
Transition Safety
In the manual approach, state transition functions can panic. For example, the `when_logged_in` function above is for transitioning from state 2 to 3, and will panic if called when not in state 2.
In the control-flow approach, this is not a problem. There is not even any need to tell the machine to transition from one state to another. As long as the `Future` is being awaited, execution of async code advances on its own.
Disadvantages
Unserializability
Future objects are opaque and not serializable. They cannot be used in serde. They cannot be persisted to disk.
A partial workaround is to keep the data we want to serialize outside the async code. For example, to support persisting username and password in the connector, I keep the strings outside the async `connect` function.
// Strings live outside the function.

// The function only borrows the string.

async fn connector(username: &mut String, password: &mut String) -> ... {

  // ...

}
Coupling of State and UI
In the control-flow approach, the async code is responsible for both managing the state and presenting the UI. This goes against the prevailing wisdom that state and UI should be kept separate.
However, the prevailing wisdom doesn't always prevail. In some cases, encapsulation is more important than separation of concerns.
The connectors of Geckotechs dashboard is one such case. We wanted the connector for each data source to be as self-contained as possible. This makes the control-flow approach perfect for us.
Conclusion
GUI programming requires a lot of state machines, and these machines can often be represented by control-flows in async code. Written as async functions, state machine code can be more concise and less error-prone. The tradeoff is less transparency at runtime.
Demo
Here's a dummy demo of the connector flow made with Async UI.
View the demo source code here.
See Also
-
Crank.js uses JS generators (which are also state machines) as components.
-
This post by Vitaliy Akimov explores using JavaScript generators for UI and state management.
-
XState solves the problem of state machine boilerplate in a different way: it introduces statechart - a concise mini-language for state machines. An interpreter is used at runtime.